My genogram is gone.
Open the editor in the same browser on the same device. If there is an automatic backup, the program offers to restore it. Otherwise open your saved file.
Handbook
From the first symbol to the finished printout, with screenshots from the program.
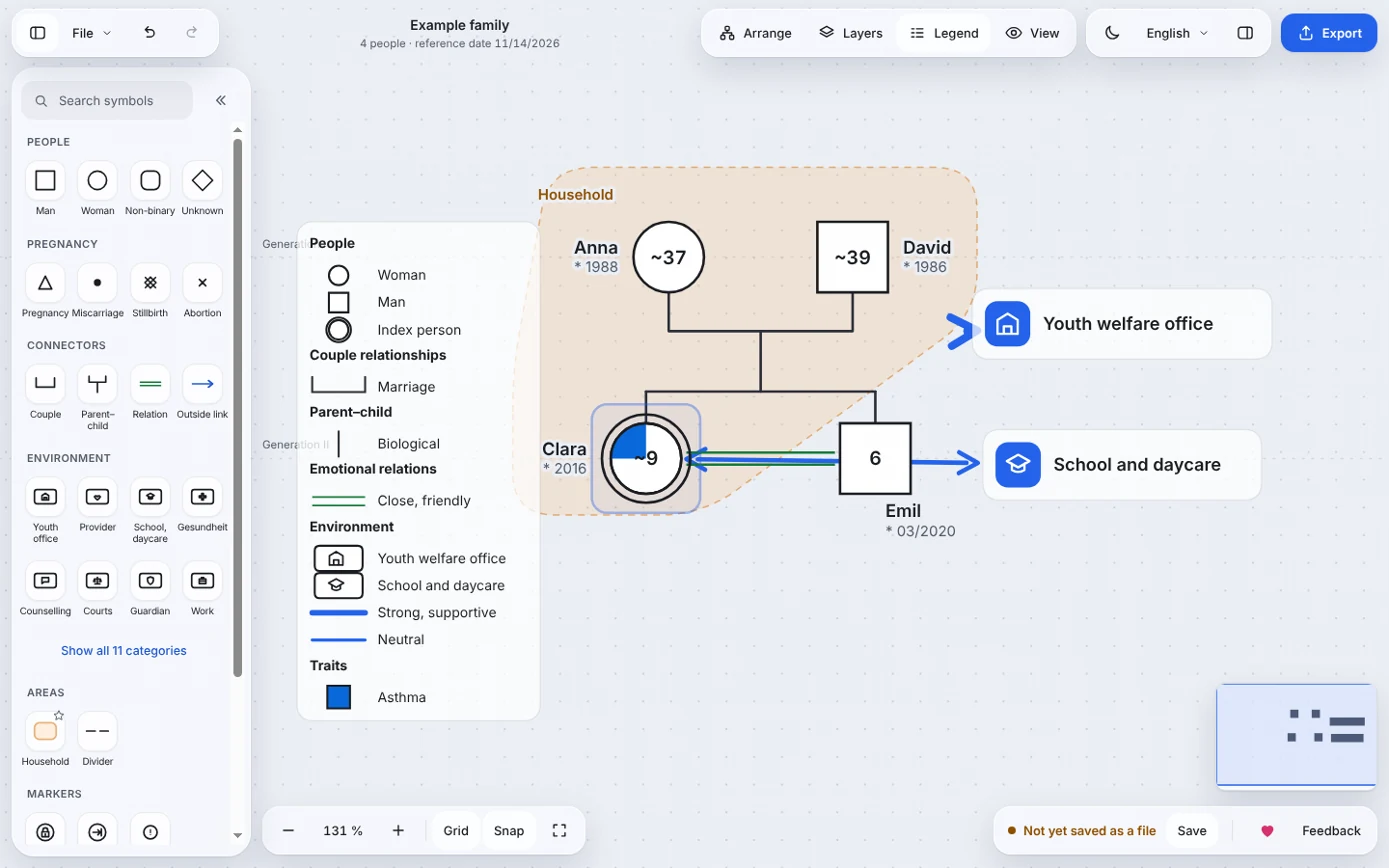
Read from the start, jump to a chapter or search for a keyword.
Chapter
Draw genograms and network maps. Free and without an account.
myGenogramm is a free editor for genograms and network maps. It was made for child, youth and family services and is just as suitable for counselling, therapy, teaching and community organisations. You drag symbols from a palette onto an open drawing area, connect them and add what matters professionally.
There is no account and nothing to install. Open mygenogramm.app in your browser and start drawing.
Everything you draw is stored on your device only: in the file you save and in an automatic backup in your browser's storage. The program sends no content to a server.
After the first visit the editor works without a network connection, for example on a home visit.
Every function can also be used on a tablet. A right-click is never required.
Chapter
Seven steps, with mouse or finger.
This is how your first genogram comes together. Every step works with the mouse and with a finger.
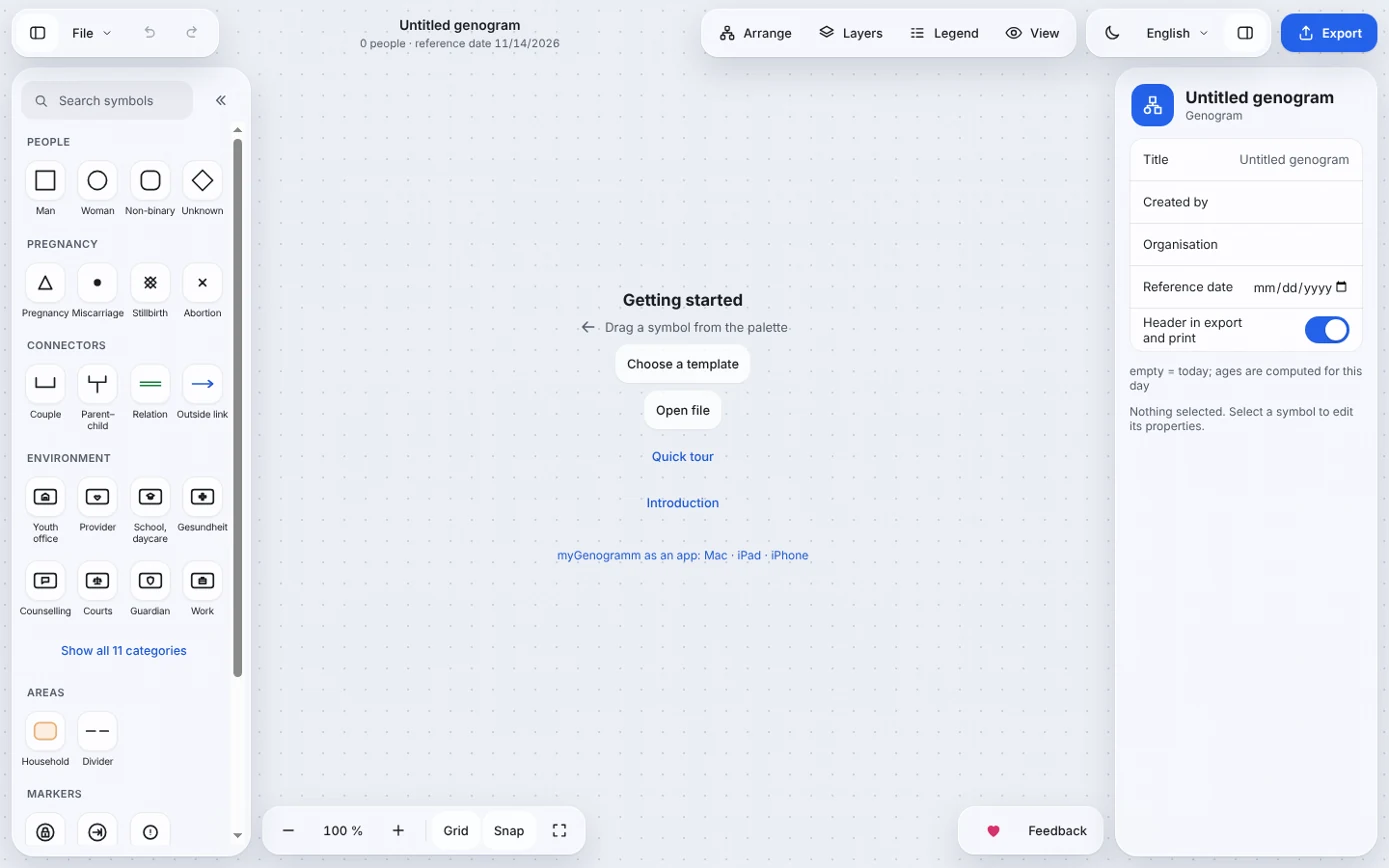
Two guided tours inside the program walk you through the controls: the Quick tour with eight steps and the Introduction with 18 steps in six chapters. Start either one on the empty drawing area or at any time from View.
Chapter
The drawing fills the window. Everything else floats above it.
The drawing area fills the whole window. Toolbar, palette, properties and status bar float above it. No dialog covers your drawing: you enter things directly at the symbol or in the area on the right.
| Area | Where | What for |
|---|---|---|
| Toolbar | top | Show or collapse the palette, the File menu, undo and redo, the title of the genogram, Arrange, Layers, Legend, the View menu, light or dark appearance, language, show or hide the properties, Export |
| Palette | left | All symbols and tools in groups: People, Pregnancy, Connectors, Environment, Areas, Markers, Text and drawing. A search field sits at the top. |
| Drawing area | centre | This is where the genogram takes shape. Fine lines mark the generations. |
| Properties | right | Details of the selection. If nothing is selected, you see title, creator, organisation and reference date of the genogram. Areas such as export, layers or settings open here as well. |
| Status bar | bottom | Zoom, Grid, Snap, Fit all, the save status with Save, a heart to say thanks and Feedback |
Click the title in the toolbar to rename the genogram. Below it you see how many people it contains and the reference date for which ages are computed. You change the reference date in the properties of the genogram. If the field is empty, today is used.
A click on the empty drawing area only clears the selection. It never creates a symbol by accident.
The palette can be collapsed to a narrow rail: with the button at the far left of the toolbar, the double arrow next to the search field, or Ctrl Alt S. Hide the properties with the button on the right of the toolbar or Ctrl Alt I. You can drag the edges of both areas to change their width. The program remembers these settings on the device.
Pin tiles you use often as favourites with the small star on the tile.
Chapter
Drag, tap, or extend with a single tap.
The People group contains four symbols: Man (square), Woman (circle), Non-binary (square with round corners) and Unknown (diamond). The gender follows the tile you choose and can be changed later.
| Way | How it works | Good for |
|---|---|---|
| Drag | Drag the tile onto the drawing area and let go | the normal case |
| Tap | Tap the tile, then tap the drawing area | anyone who finds dragging difficult |
| Series | Double-tap the tile; every tap on the drawing area places another symbol until you choose Done | many people in a row |
After you create a person, the name field right at the symbol is active. Type the name, press Enter, done. Later you change the name with a double-click on the person, with F2 or in the properties.
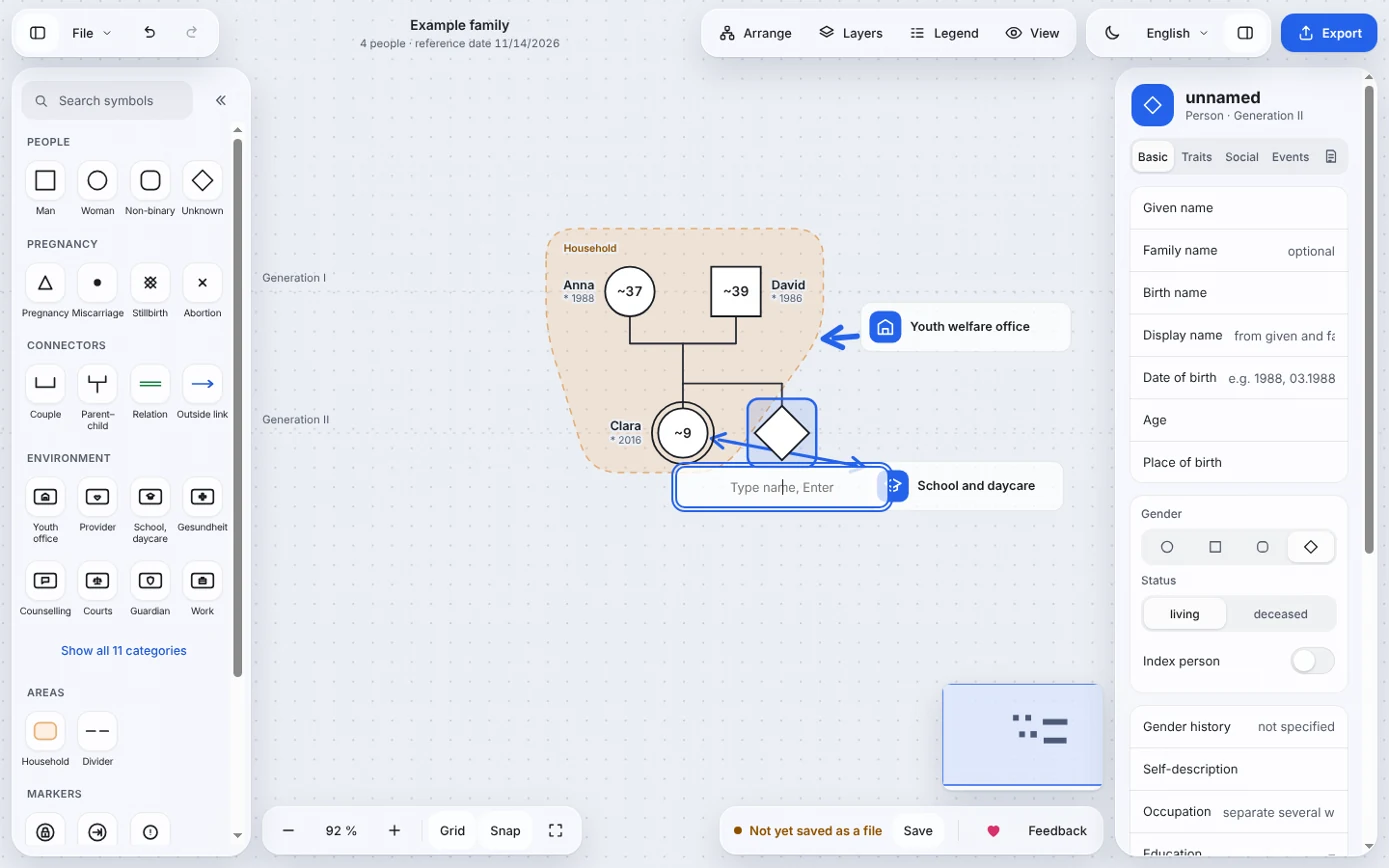
When exactly one person is selected, a small bar appears above it:
Below the person sits the bar with the actions for the selection: Edit name, Duplicate, Delete and More actions (three dots).
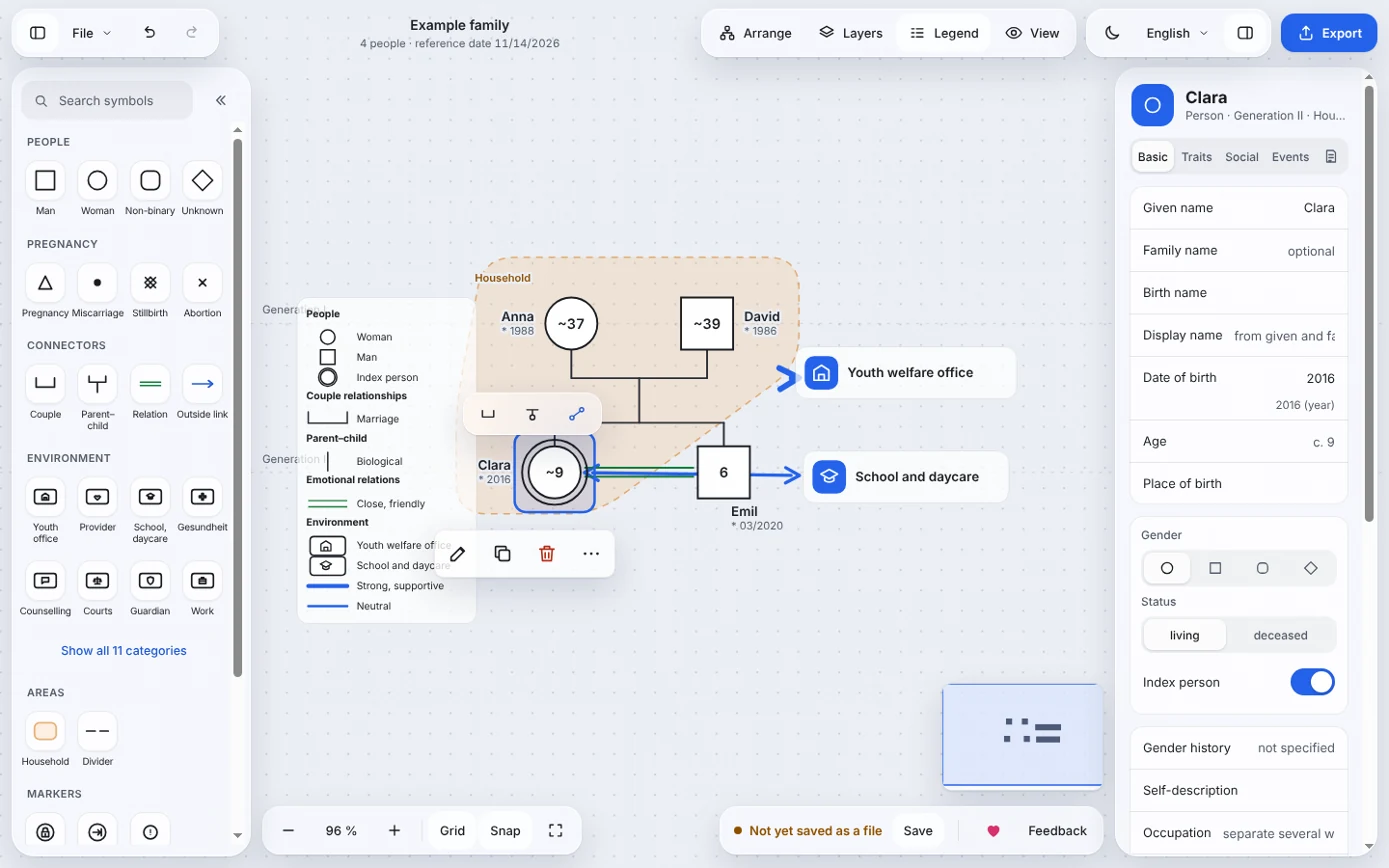
If you drag a person symbol onto something that already exists instead of onto the empty area, the relationship is created with it:
| Drop on | Result |
|---|---|
| the empty area | a single person |
| a couple line | biological child of this couple |
| a person | a choice: Partner, Child, Parent or Sibling |
| a household | The person becomes a member of the household. |
The Pregnancy group contains Pregnancy, Miscarriage, Stillbirth and Abortion. These symbols behave like children: drag them onto a couple line or connect them to a parent.
Chapter
Names, dates and appearance. Changes apply immediately.
Select a person and the area on the right shows their properties in five tabs: Basic, Traits, Social, Events and notes. Changes apply immediately. There is no save button there.
| Field | Note |
|---|---|
| Given name, family name, birth name | The display name is built from given and family name. You can overwrite it. |
| Date of birth | As precise as you know it: 1988, 03.1988, 12.03.1988 or ca. 1950. Below the field you see how the program understood your entry. |
| Age | Computed at the reference date. If only the year is known, a tilde is shown in front (~37). Without a date of birth you can enter the age directly. |
| Place of birth | free text |
| Gender | female, male, non-binary, unknown |
| Status | living or deceased. With “deceased”, date of death and cause of death are added; the symbol gets a cross. |
| Index person | The person the genogram is about. It gets a double outline. |
| Gender history, self-description | not specified, trans man, trans woman; plus a free self-description |
| Occupation, education | Separate several occupations with commas. |
| Sexual orientation | free text, only if professionally necessary |
| Photo | Add photo … embeds a picture in the file. You can adjust the crop. The photo sits inside the symbol. |
| Connections | A list of all lines of this person. A click selects the line without you having to hit it on the drawing area. |
| Label position | Position of name, age and dates: automatic, top, bottom, left, right, inside or hidden |
| Appearance | Colour for fill and outline |
At the end of the area you find Pin and Delete. A pinned person stays in place when you arrange.
When several people are selected, the properties show the fields they share. Differing values appear as “– mixed –”. Only what you actually change is applied.
Chapter
Drag from symbol to symbol, then choose the type from tiles.
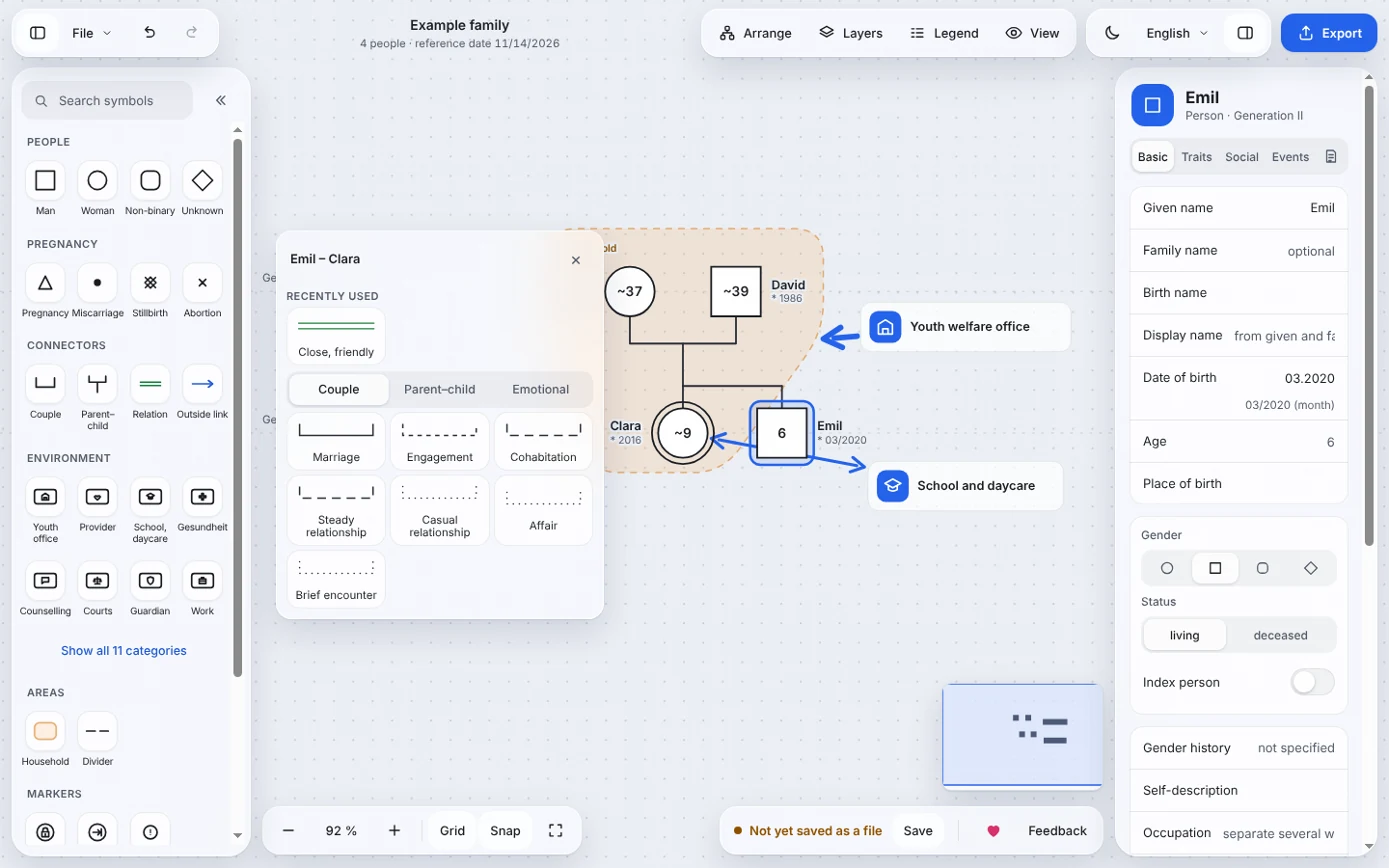
Lines are created by dragging from symbol to symbol. You then choose the type from tiles that show the line as it will be drawn. Only what fits the combination is offered.
| From | To | Offered |
|---|---|---|
| Person | Person | couple, parent–child (with direction), emotional relation |
| Person | Couple line | child of the couple |
| Person | Institution, external person, pet | outside connection |
| Institution | Household | outside connection to the whole household |
Select the couple line to set type and state.
A person can have any number of couple relationships.
The line between parents and child knows the types Biological, Adopted, Foster child and Guardianship, plus sperm donation, egg donation and surrogacy. Adoption, foster care and guardianship are recognisable by the line style and by the letters A, F and G at the symbol.
Select two or more siblings of the same parents and choose Connect as twins or Connect as identical twins in the actions for the selection. The child lines then meet at one point.
Emotional relations show how two people relate to each other. The catalogue contains 30 types in seven groups:
| Group | Types |
|---|---|
| Positive | Harmony · Close, friendly · Very close friendship · Love · In love · Admiration |
| Distance | Distant, indifferent · Mistrust · Cutoff · Cutoff repaired |
| Conflict | Discord, conflict · Hostile · Distant-hostile · Close-hostile · Hate |
| Enmeshment | Fused · Fused-hostile |
| Violence and abuse | Violence · Distant-violent · Fused-violent · Abuse (general) · Physical, emotional and sexual abuse · Neglect |
| Control | Controlling · Manipulative |
| Attention | Focused on · Negatively focused on · Caring |
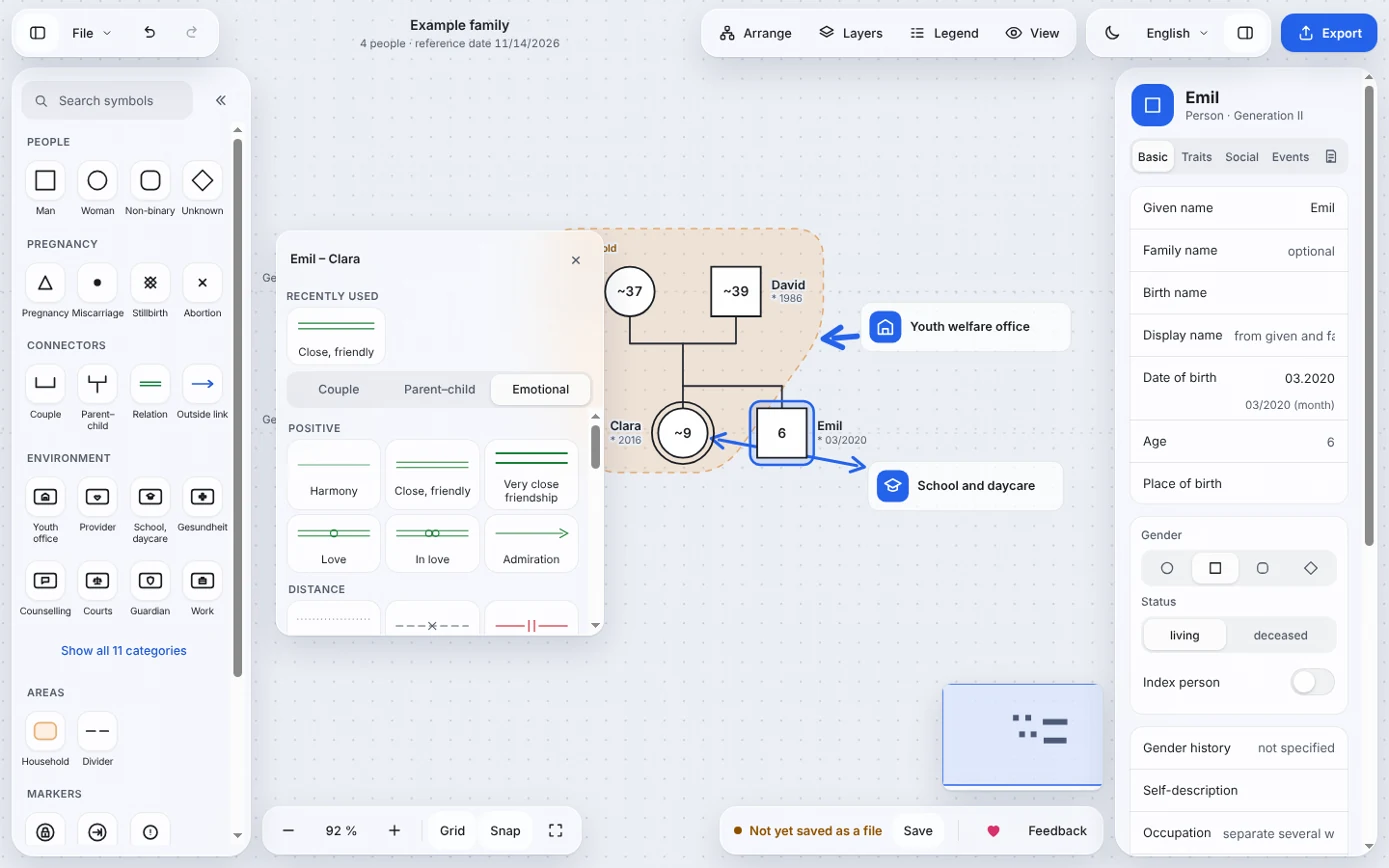
In the properties of a relation you change type, direction (for directed types such as “Caring”), label, period, colour and note. Several relations between two people are possible; they are drawn side by side.
You create your own line types in the line builder, see Catalogues.
Chapter
The genogram becomes a network map.
Institutions and outside connections turn the genogram into a network map: you see who supports the family and where contacts are a strain or missing.
The Environment group shows eight categories, and the full list with Show all 11 categories. Each category has its own symbol:
| Category | Examples |
|---|---|
| Youth welfare office | children's social care, fostering service |
| Service provider / family support | family support worker, residential group |
| School and daycare | school, nursery, after-school care, school social work |
| Health | GP practice, hospital, therapy, early intervention |
| Counselling | parenting advice, addiction counselling, debt advice |
| Courts and authorities | family court, children's guardian, job centre |
| Guardianship | official guardian, legal guardianship for adults |
| Work and training | employer, training scheme |
| Clubs and leisure | sports club, youth centre |
| Faith community | congregation |
| Other | freely named |
In the properties of an institution you enter name, type, contact person, role, period and comment. With Attach to person the institution moves along when you move the person.
The environment also includes External person (dashed outline, for example a neighbour or a coach) and Pet.
Drag a connection from a person or a household to an institution. The line shows the quality of the contact:
| Quality | Shown as |
|---|---|
| Strong, supportive | thick line |
| Neutral | plain line |
| Weak | thin dashed line |
| Stressful | zigzag |
| Needed, not available | dotted with an open end |
Set the direction of the flow of resources with none, to the family, from the family or mutual. It appears as an arrow.
A household is a coloured area around the people who live together. You create it like this:
The area follows its members. You change name, colour, opacity and line style in the properties. If you drag the area, all members move with it.
In the Text and drawing group you find Pen, Eraser and Lasso. The pen draws in a colour and width of your choice. The eraser removes strokes you tap or wipe over. The lasso encircles an area and gives it a label. Once you draw with a stylus, your finger only moves the view.
Chapter
Record what matters professionally.
With the tabs Traits, Social and Events you record what matters beyond names and dates.
On the Traits tab you choose from 64 entries in twelve categories under Add trait, from cardiovascular through mental health and addiction to development. Where one exists, the ICD-10 code is shown. For each trait you can enter a detail, the severity (mild, moderate, severe), the year of diagnosis, an end, “active” and a note.
The trait appears as a coloured quarter in the symbol and in the legend. Under More details there are lists for medications, allergies and hospital stays.
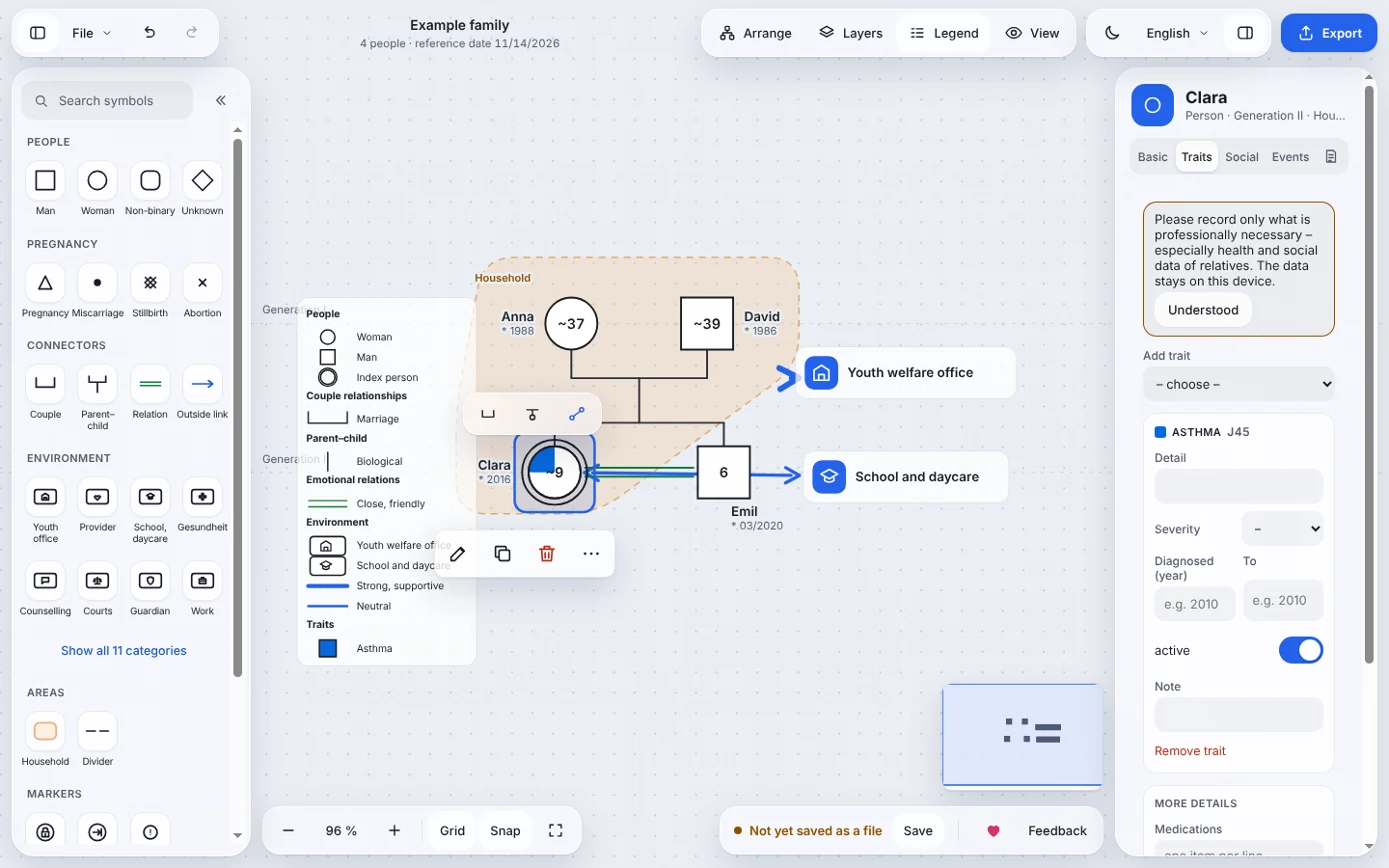
The Social tab contains traits from child and youth services and nine text fields on mental and social matters. The traits reflect the German child and youth welfare system, for which the program was first made.
| Area | Traits |
|---|---|
| Custody | joint, sole, withdrawn, partly withdrawn, suspended |
| Residence | with mother, with father, shared residence, foster family, residential group, whereabouts unknown |
| Guardianship | official guardian, individual guardian, supplementary curator |
| Current support | with your own detail on the kind of support |
| Child protection | risk assessment ongoing, safety plan in place |
| School and care | school type, class, daycare |
The text fields under Mental and social are Relationship patterns, Coping, Stressors, Substance use, Therapy history, Socio-economic situation, Religion, Migration history and Legal matters.
On the Events tab you record life events of a person: title, date or age, end or “ongoing”, category and description. The categories are Birth, Loss, Transition, Health, Relationship, Stress, Success, Support and measures, and Other. The program takes birth, death, marriage and separation from the genogram itself. All events appear in the timeline.
Under File → Catalogues you extend the program with your own entries:
Entries you use are saved inside the genogram file. The file therefore looks the same on every device.
Chapter
One click puts the genogram in shape.
| Action | Mouse and keyboard | Finger |
|---|---|---|
| Select | click | tap |
| Select several | Shift and click; drag a frame on the empty area while holding Shift | a long press on the empty area starts the frame; or View → Multiple selection |
| Select all | Ctrl A | – |
| Move | drag, or arrow keys | drag |
| Rename | double-click, F2 or Enter | double-tap |
| Delete | Del | bin at the selection |
| Clear selection | Esc or a click on the empty area | tap on the empty area |
Under More actions (three dots) at the selection you find Connect to …, Form household, Copy, Cut, Pin on/off, Index person on/off and collapsing and expanding the family of origin and the descendants. With several people selected, Arrange selection and Align are added.
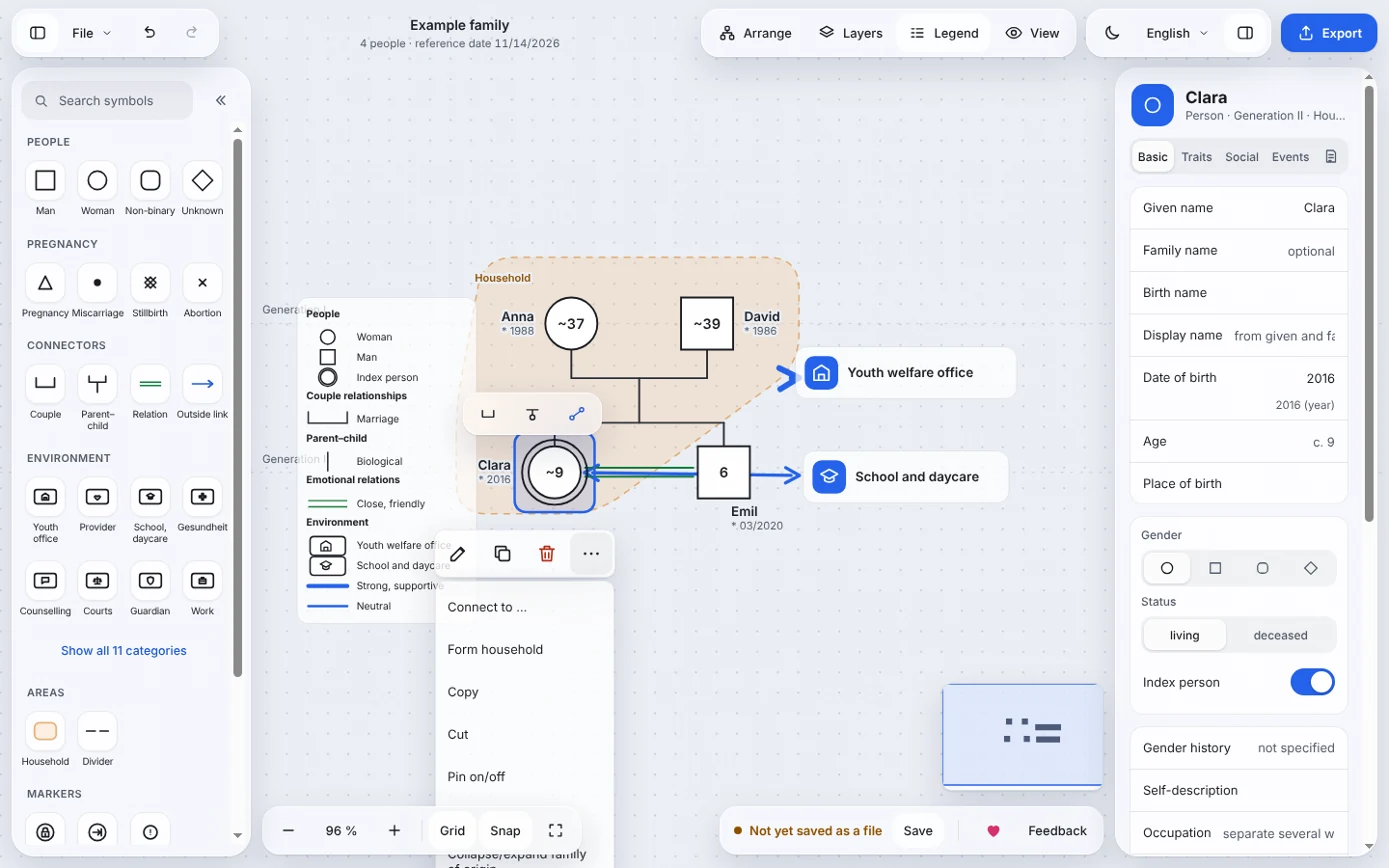
Arrange in the toolbar puts the genogram in shape by generation: the older generation at the top, partners side by side, children from left to right by date of birth, the environment to the right. Pinned symbols stay where they are. Arranging is a single step and can be undone.
Every step can be undone. The button names the step, for example “Undo: Child added”. Copy, paste and duplicate keep the relationships within the selection. Paste is also in the File menu.
Chapter
The same data, shown differently.
The View menu gathers everything that shows or analyses the genogram differently without changing the data.
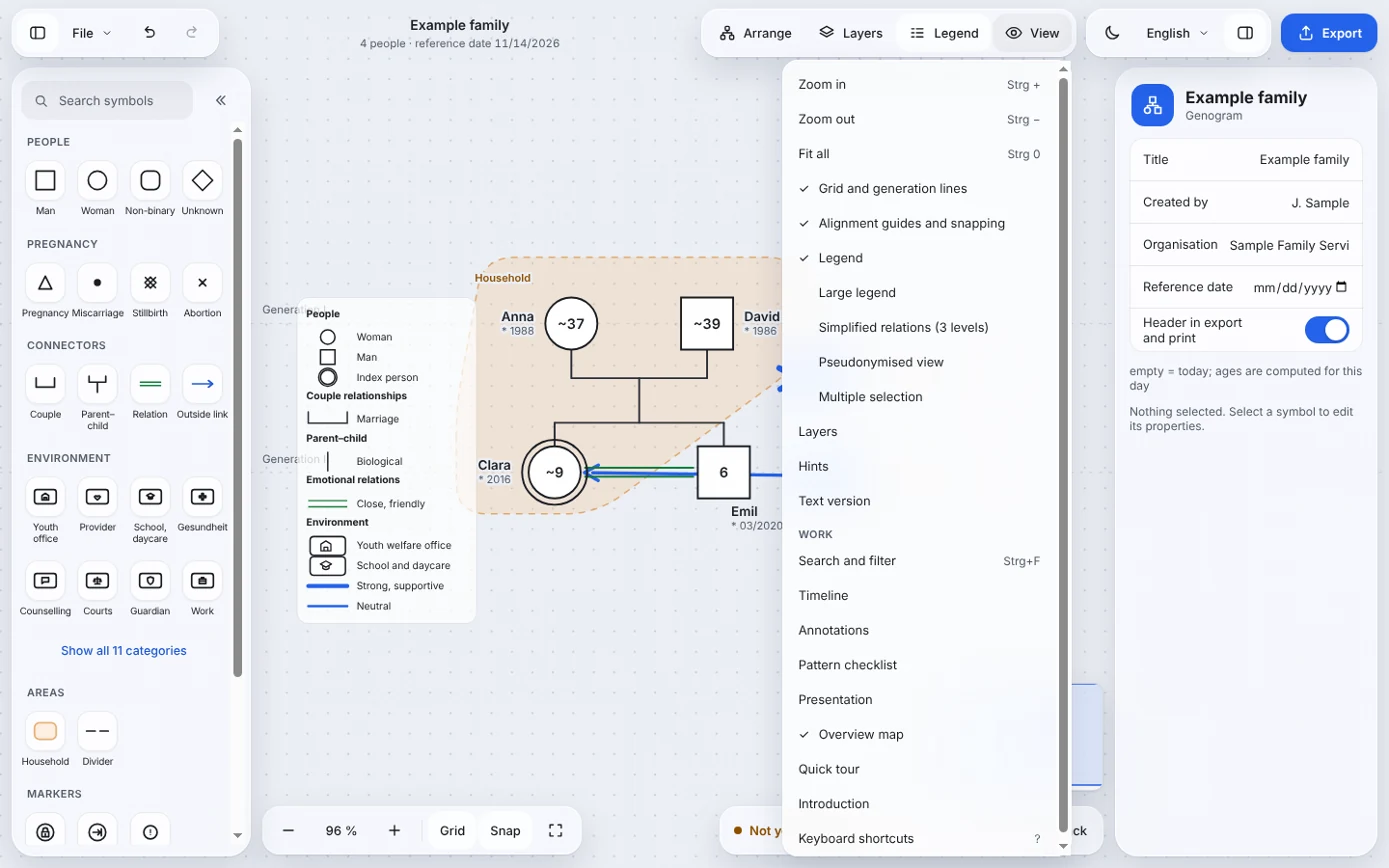
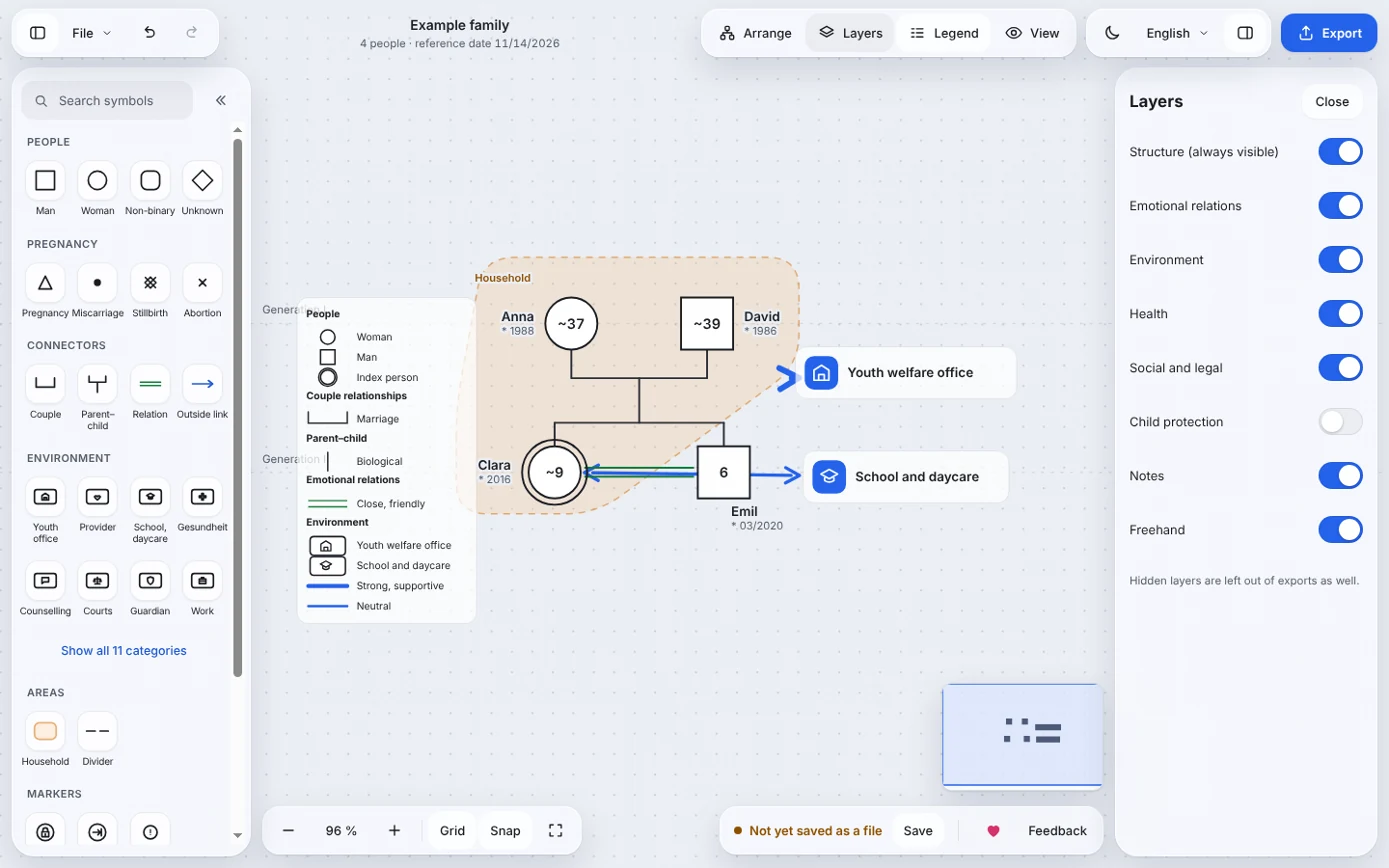
Layers shows and hides topics: Emotional relations, Environment, Health, Social and legal, Child protection, Notes and Freehand. The structure is always visible. Hidden layers are left out of exports as well. This lets you produce different printouts from one file.
Legend shows a legend on the drawing area that lists only what occurs in the genogram. You can move it. View → Large legend enlarges it. In exports the legend is included by default.
View → Search and filter or Ctrl F searches names, occupations, notes, traits and events. You can also filter by generation, gender, status and trait. Matches are highlighted, everything else is dimmed.
From the more actions of a person you collapse their family of origin or their descendants. A placeholder with the number of hidden persons takes their place. A tap on it expands the branch again.
The program checks the drawing continuously and reports anything unusual without blocking you. If there are hints, a counter appears in the status bar. Open the list there or with View → Hints. A tap on an entry jumps to the object.
| Hint | Meaning |
|---|---|
| Overlapping symbols | Two symbols lie largely on top of each other. |
| Person without connection | A person has no line and belongs to no household. |
| Implausible age | For example a child who is older than a parent. |
| Deceased without data | Status “deceased”, but neither a date nor an age. |
| Several index persons | More than one person is marked as index person. |
| Out of generation row | A person lies outside its generation line. |
Each check can be switched off individually in the list.
View → Text version describes the genogram in sentences: who is a couple with whom, who is whose child, which relations and outside connections exist. With Copy text you take the description into another program.
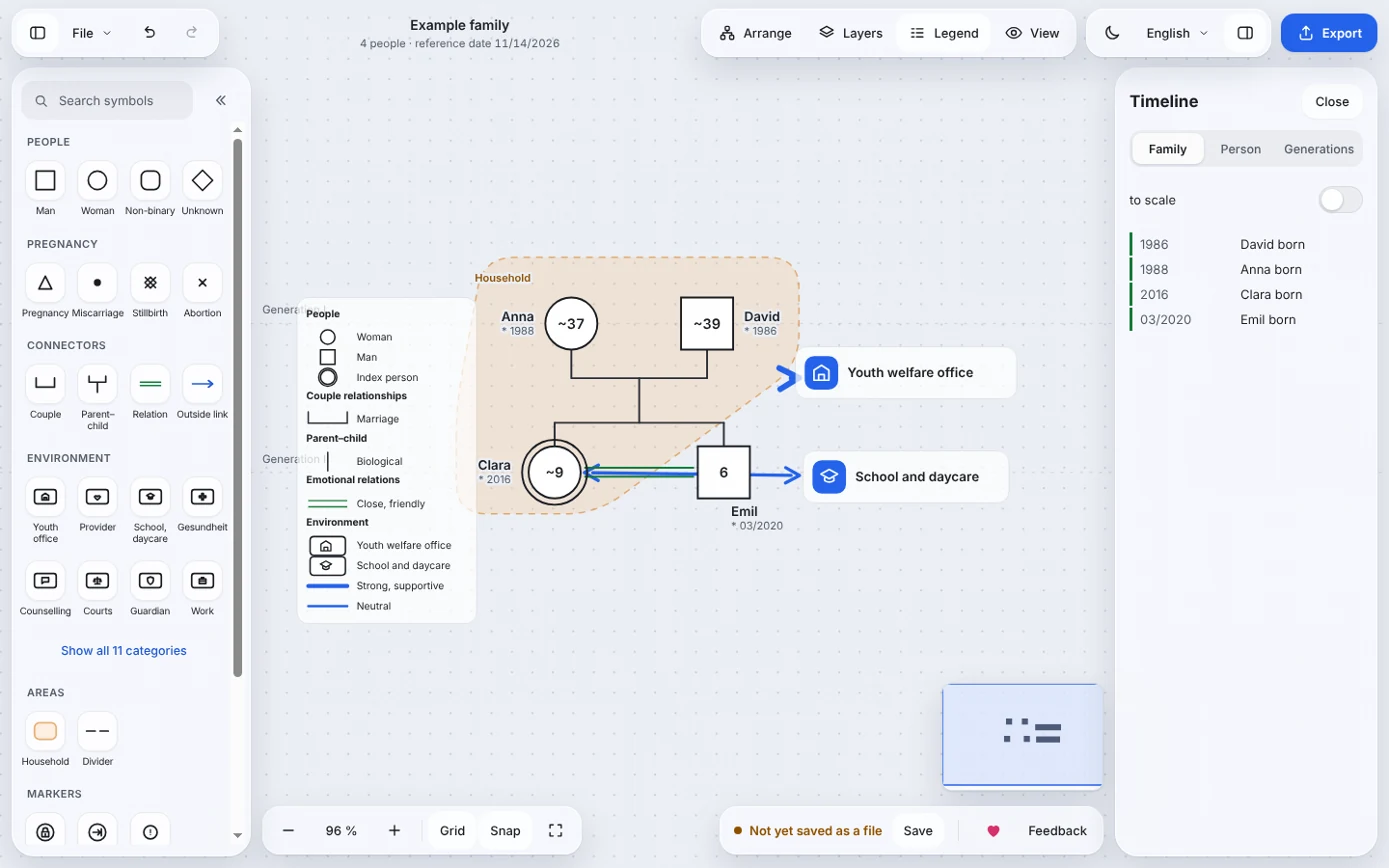
The timeline orders all dated events. There are three views: Family (everything in chronological order), Person (only the selected person) and Generations (the same ages one below the other, to spot patterns across generations). With to scale the spacing matches the time spans.
Annotations are dated notes on a person, a relation, an institution or the whole genogram. Each annotation has a category: Observation, Hypothesis, Intervention, Follow-up or Resource. This is how you keep track of the course over several sessions.
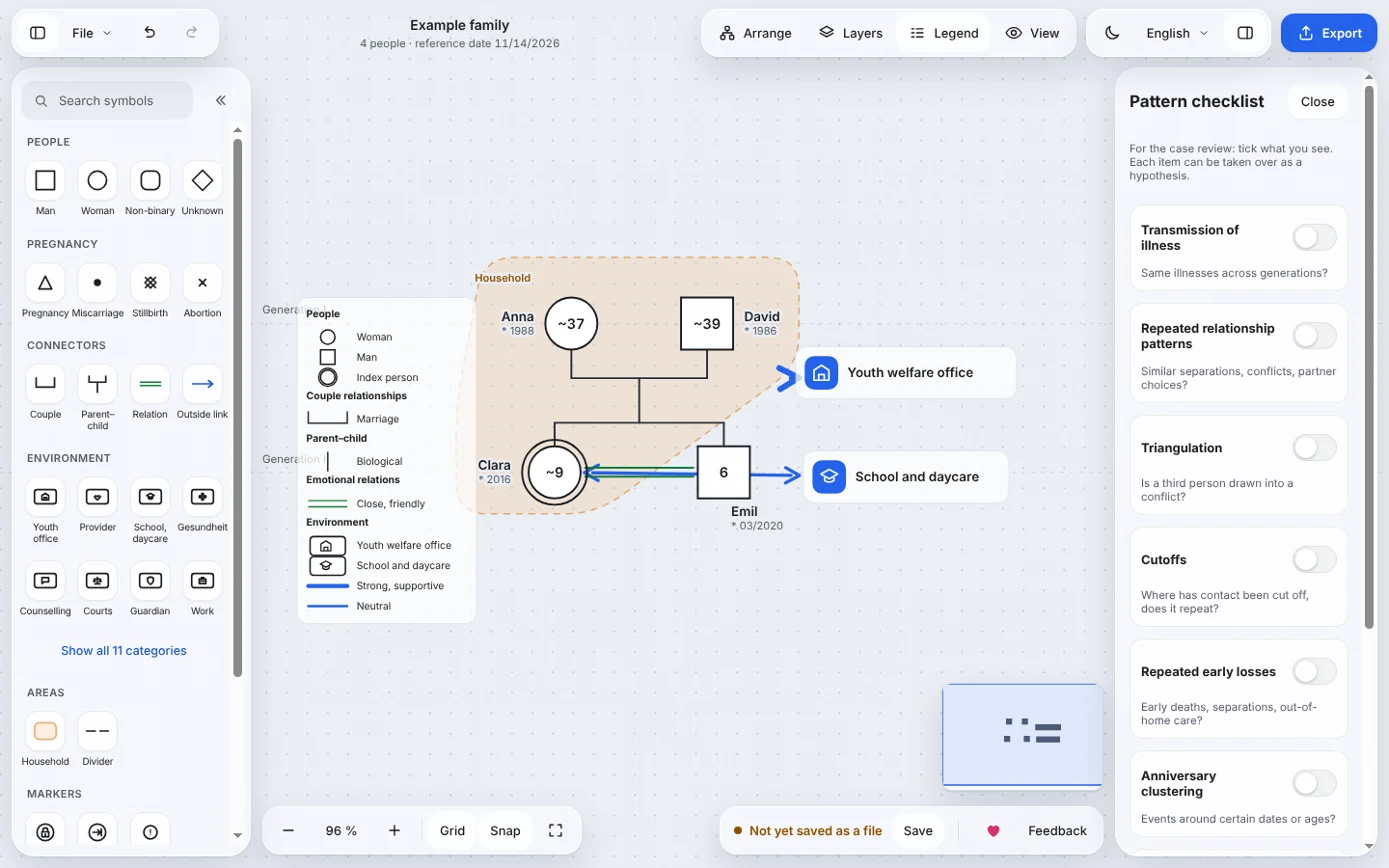
The checklist supports the case review with nine questions, for example on transmission of illness, repeated relationship patterns, triangulation, cutoffs or missing information. Tick what you see, note what stands out, and take the item over into the annotations with Take over as hypothesis.
With View → Presentation you build up the genogram step by step in front of others. A slide remembers the visible section, the visible layers and, if you have selected something, only the selected people. Current view as slide creates a slide, Present starts in full screen. Continue with the arrow keys, the space bar or a swipe, and end with Esc. Each slide can carry a title and speaker notes.
Chapter
One file that looks the same on every device.
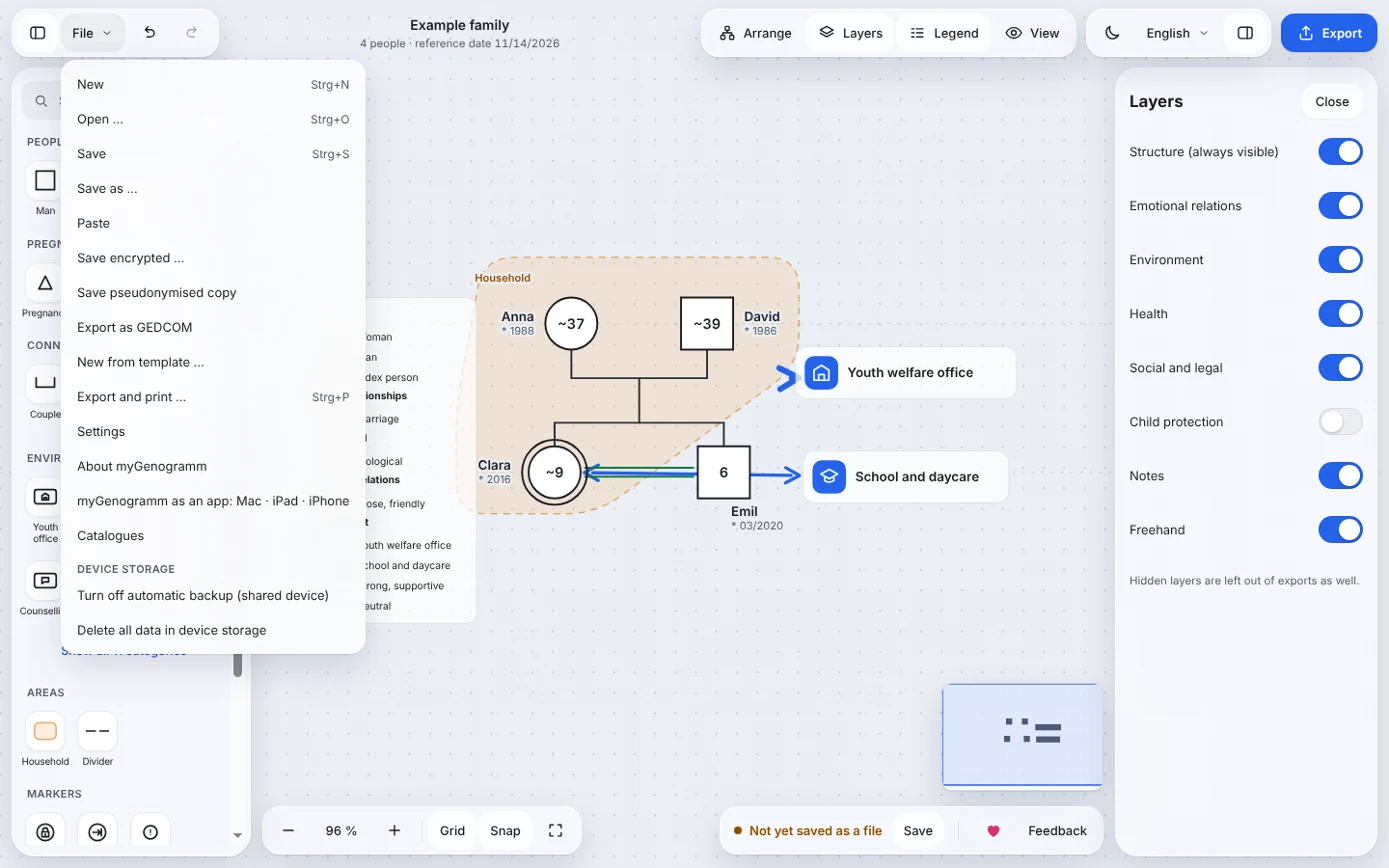
File → Save, Ctrl S or Save in the status bar saves the genogram as a file ending in .genogramm.json. Depending on your browser, you either choose where to save and the program overwrites that file from then on, or the file lands in your downloads folder.
The file contains the whole genogram including photos and the catalogue entries you used. It can be opened again on any device, in the browser as well as in the apps.
While you work, the program saves the current state in the browser's storage a few seconds after every change. If you close the window by accident, the program offers to restore it the next time you start.
| Shown in the status bar | Meaning |
|---|---|
| Not yet saved as a file | The current state exists only in the automatic backup on this device. |
| Saved · time | The current state is saved in the file. |
| Not saved | The automatic backup is switched off and there are unsaved changes. |
File → New from template … or Choose a template on the empty drawing area opens eight built-in templates:
| Template | Content |
|---|---|
| Empty | empty drawing area |
| Single person | one index person |
| Nuclear family | parents and two children |
| Three generations | grandparents, parents, children |
| Blended family | divorced marriage and new partnership |
| Single parent | one parent with two children |
| Foster family | foster child with birth family |
| Family with support network | household, youth office and school |
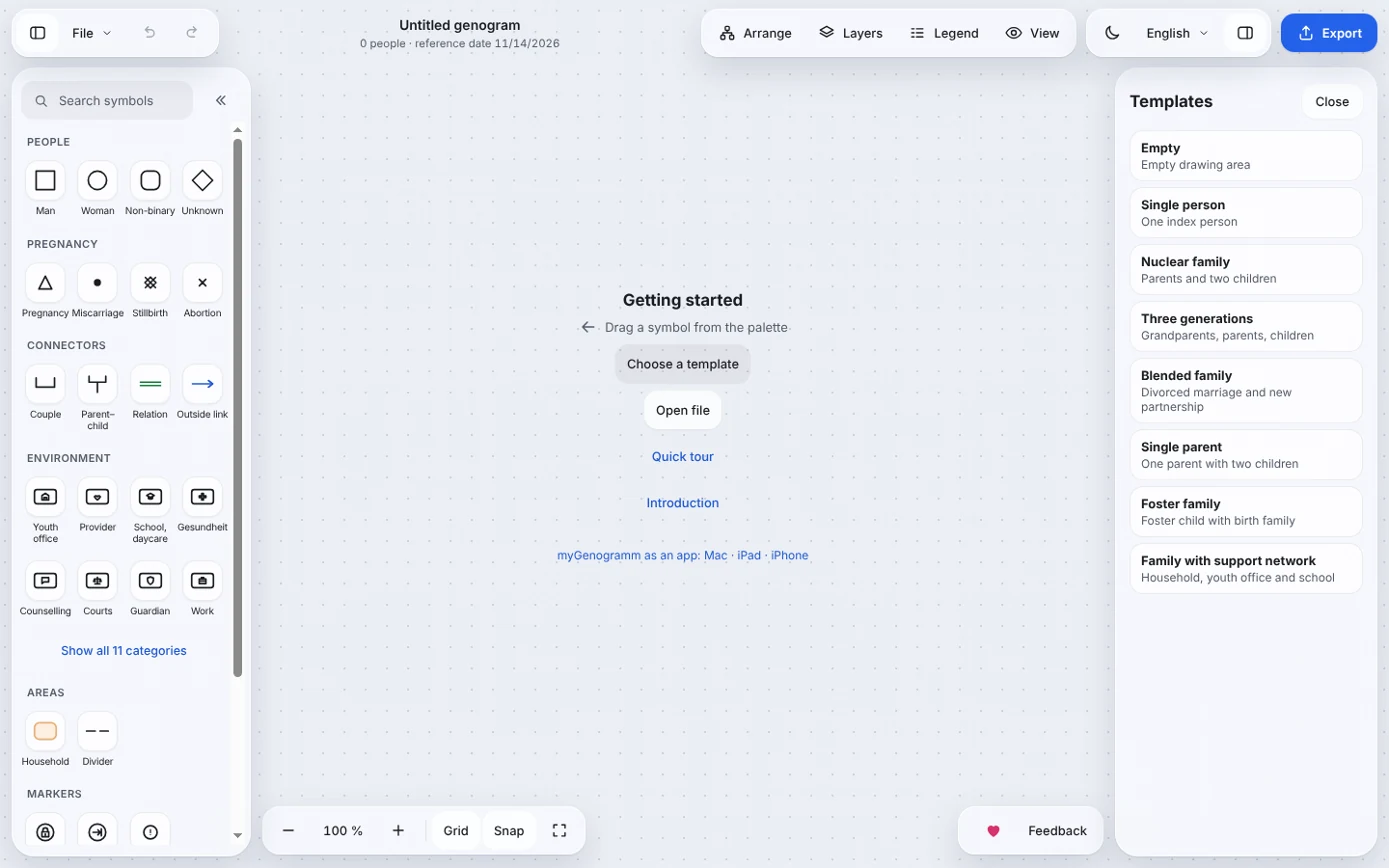
A template replaces the current genogram. This is a normal step that you can undo. With Save as template you store the current genogram as a template of your own. Your own templates are stored on this device only and contain neither title nor annotations.
File → Export as GEDCOM writes the family structure in GEDCOM 5.5.1, a format read by genealogy programs: names, gender, birth and death, couples with marriage and divorce, children with adoption and foster care. When you open a GEDCOM file, the program arranges the people automatically. Emotional relations, environment and traits are not part of GEDCOM.
Chapter
PDF, PNG, SVG or straight onto paper.
Export in the toolbar, File → Export and print … or Ctrl P opens the Export and print area with a preview of the page.
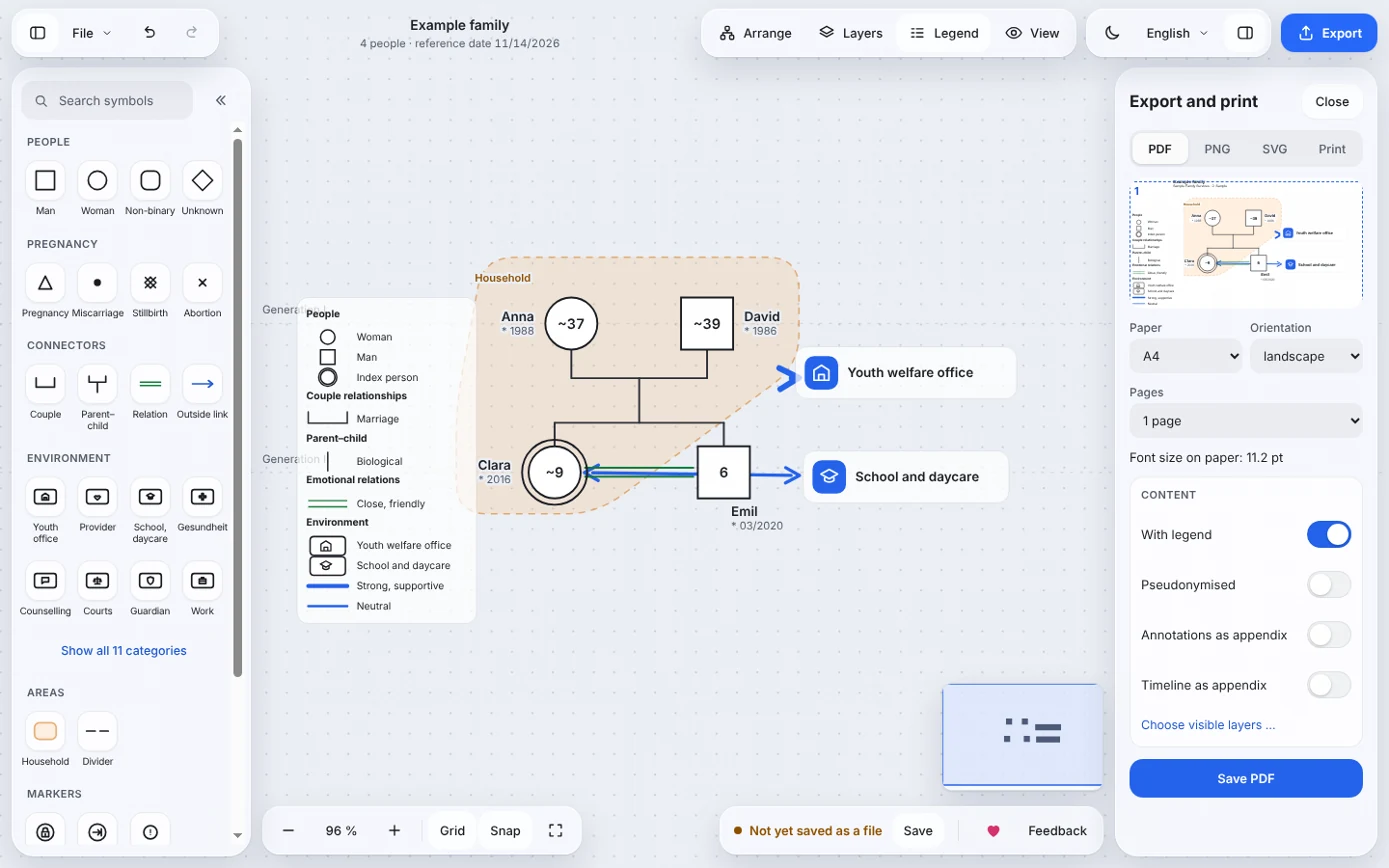
| Format | Settings | What for |
|---|---|---|
| Paper A4 or A3, landscape or portrait, split over 1, 2 or 4 pages | care plan, case file, passing on. The drawing stays sharp at any size. | |
| PNG | Resolution 96, 192 or 300 DPI; white or transparent background | a picture for reports and presentations |
| SVG | – | further editing in a graphics program |
| as for PDF | directly through your device's print dialog |
The header with title, organisation, creator and reference date comes from the properties of the genogram. Switch it on and off there with Header in export and print.
Export and print are always light on a white background, even if you work in the dark appearance. Every line type also differs in shape, so a black-and-white printout stays unambiguous.
Chapter
Pseudonymise, encrypt, tidy up the device.
Genograms contain sensitive information about people, often about third parties too. myGenogramm is built so that this information does not leave your device. For everything else there are four tools.
View → Pseudonymised view replaces the names with roles relative to the index person: Mother, Father, Brother 1, Index person. Anyone without such a role is called P1, P2 and so on. Dates of birth are shortened to the year. Places, notes, photos and causes of death disappear, institutions show only their category.
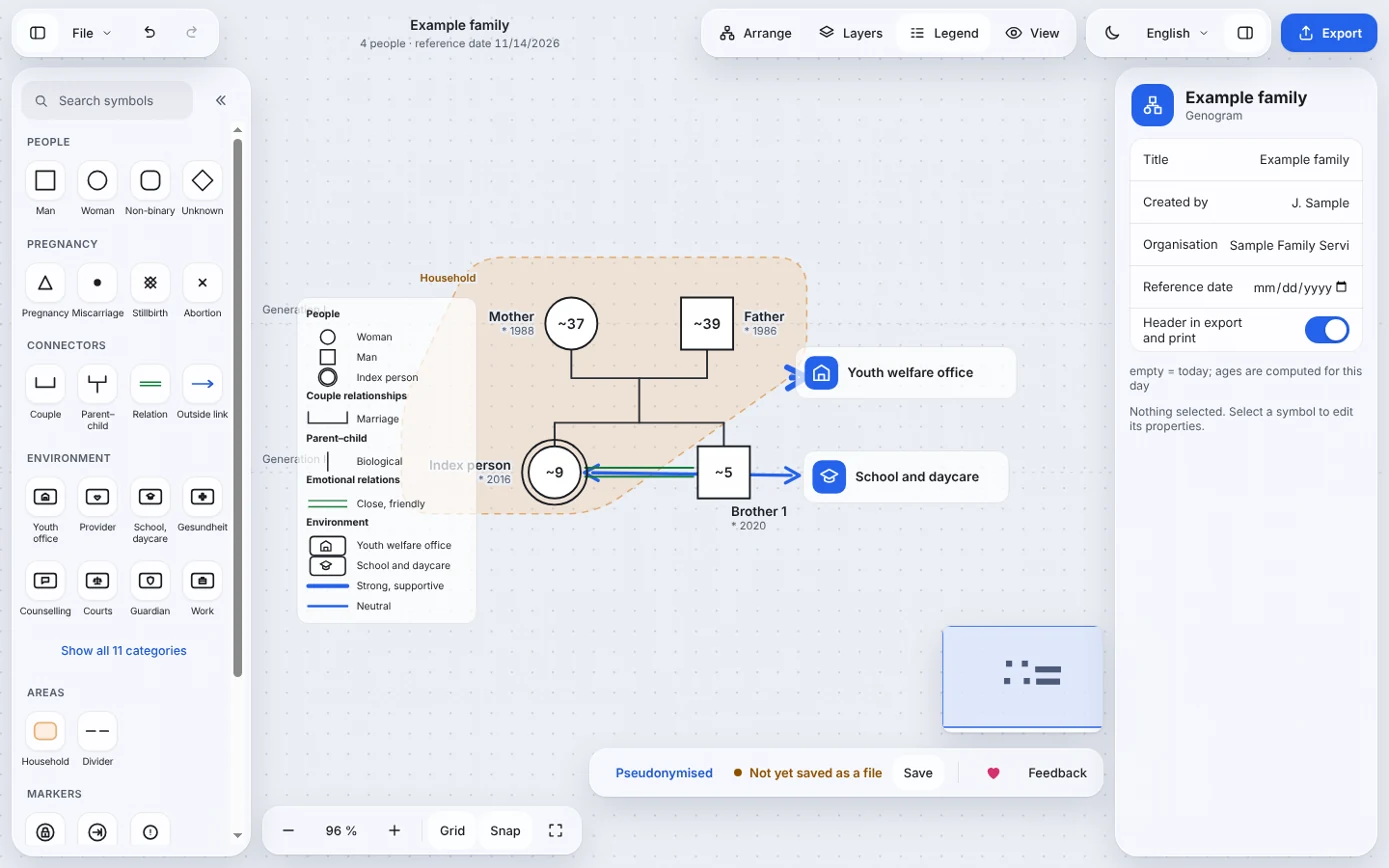
The view applies to screen, export and print. The file stays unchanged. While the view is on, the personal fields are locked. A tap on Pseudonymised in the status bar switches it off again.
File → Save pseudonymised copy creates a file of its own that no longer contains real names or free text at all. You can pass this copy on for supervision, teaching or case review. Your original stays as it is.
File → Save encrypted … protects the file with a password of at least eight characters. The program asks for it when the file is opened.
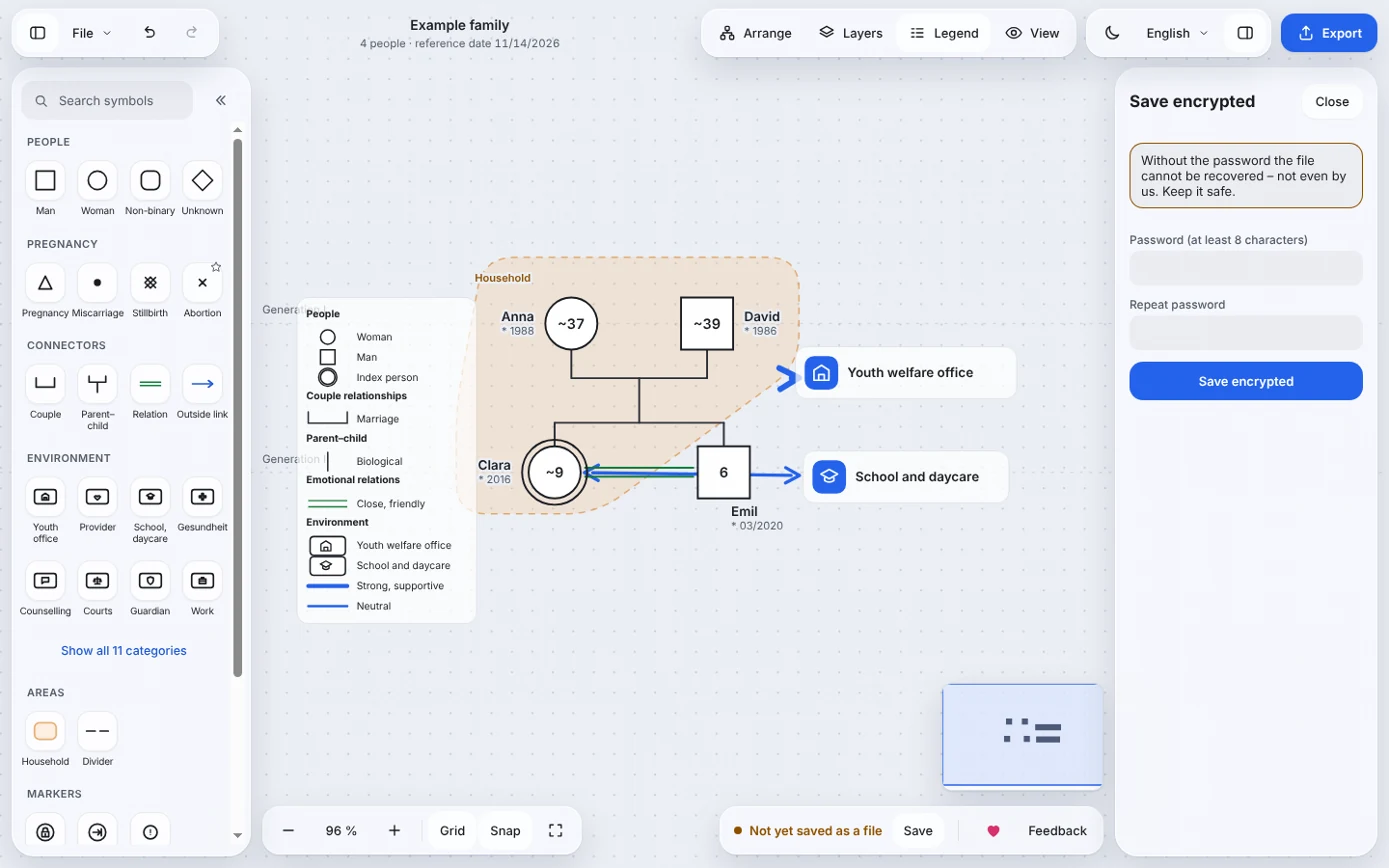
If several people work on one device, switch off the automatic backup: File → Turn off automatic backup (shared device). After work, Delete all data in device storage removes the backup, the list of recently opened files and the settings from the browser. Saved files are not affected.
Where genogram files are stored, who may access them, how the devices are protected and when files are deleted is for your organisation to decide. You will find a summary in plain language in the program under File → Settings → Data protection for organisations.
Chapter
Light or dark. English or German.
File → Settings opens the settings in the area on the right.
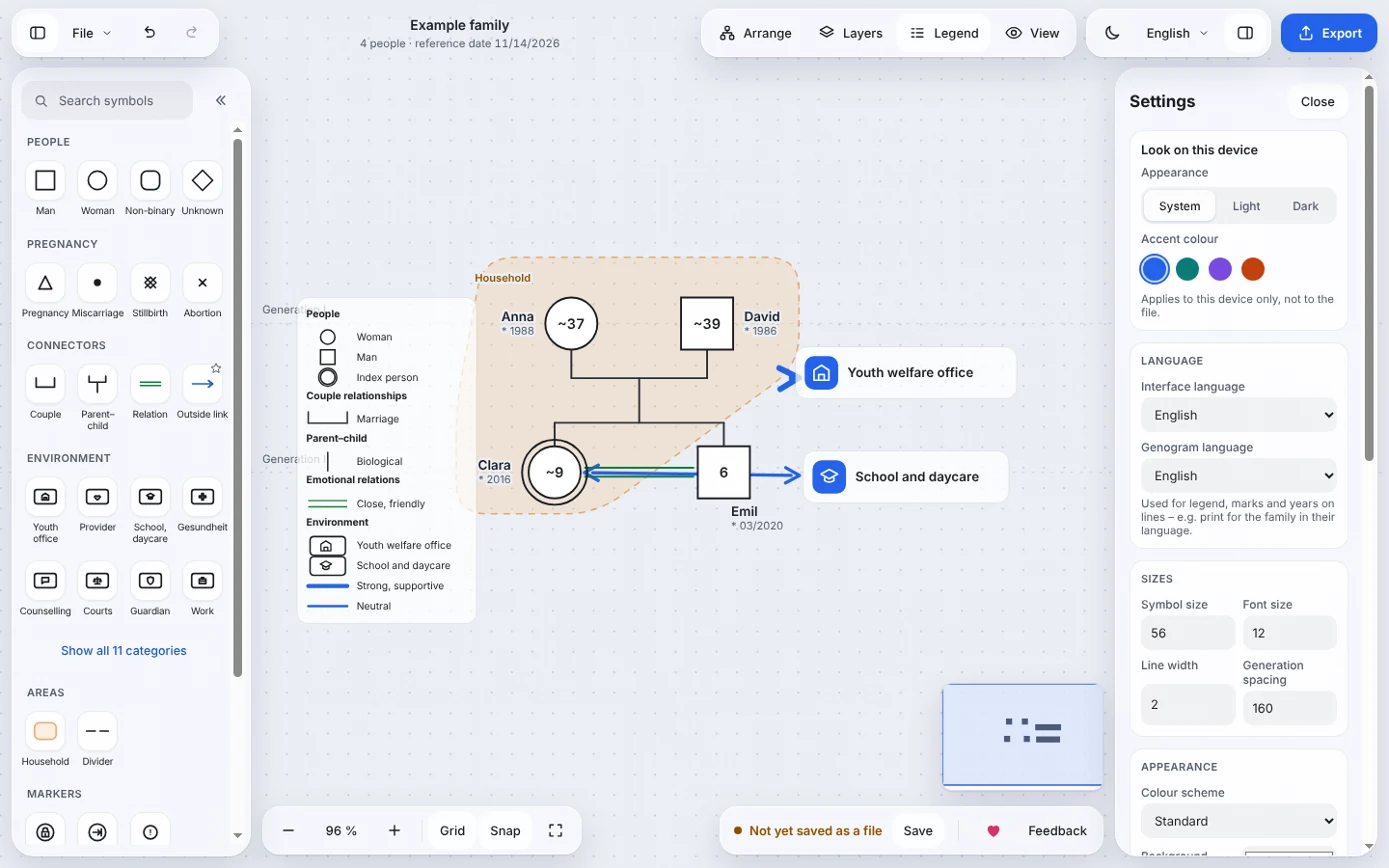
| Section | Settings | Applies to |
|---|---|---|
| Look on this device | Appearance System, Light or Dark; accent colour Blue, Petrol, Violet or Orange | this device |
| Language | Interface language; Genogram language | device and file respectively |
| Sizes | Symbol size, Font size, Line width, Generation spacing | the file |
| Appearance | Colour scheme Standard, Monochrome or Strong; Background colour; Grid and generation lines; Alignment guides and snapping | the file |
| Details at the symbol | Age, Dates, Occupation, Traits as text line | the file |
| Default label position | Name, Age, Dates; applied to all persons | the file |
| Device storage | No automatic backup; Delete all data; Data protection for organisations | this device |
You can also switch between light and dark appearance with the moon button in the toolbar.
myGenogramm is available in English and German. The language menu in the toolbar shows two lists:
This lets you work in one language and print for a family in theirs. An empty genogram follows the interface language. A genogram you have already drawn keeps its language until you change it in the language menu.
Chapter
Everything works without a mouse too.
Open the overview in the program with ? or View → Keyboard shortcuts. On a Mac, use ⌘ instead of Ctrl. Some menus label the Ctrl key “Strg”, its German name.
The whole program can be operated with the keyboard. With Tab you move through the symbols on the drawing area; each has a text description for screen readers.
Chapter
The same features, a different layout.
myGenogramm adapts to the width of the screen. The features stay the same; only the layout changes.
| Device | Layout |
|---|---|
| Computer | palette on the left, properties on the right, both permanently visible |
| Tablet | palette as a narrow rail with fly-outs; show the properties when you need them |
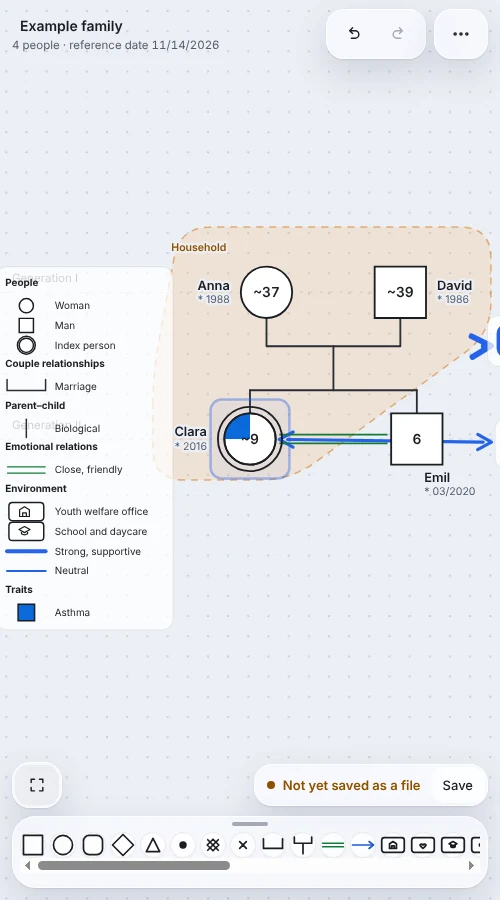
| Phone | Palette as a bar at the bottom that you can swipe through and pull up. At the top right undo, redo and the three-dot menu, which contains all other commands. Properties and areas open as a side panel from the right. |
For Mac, iPad and iPhone, myGenogramm has also been built as a dedicated app with the same features and the same file format. A file you saved in the browser opens in the app and the other way round. The app starts with an empty genogram; a file is only created when you save. On the iPad you draw with Apple Pencil. Get the apps on the App Store.
Chapter
Tours inside the program, frequent questions, licence.
Open the editor in the same browser on the same device. If there is an automatic backup, the program offers to restore it. Otherwise open your saved file.
The program tells you why: not a genogram file, damaged, encrypted, or from a newer version of the program. In the last case, reload the page to get the current version.
The legend follows the genogram language. Change it in the language menu.
In the export, choose A3 or spread it over 2 or 4 pages.
It is pinned. Unpin it in the properties.
An encrypted file cannot be opened without the password. There is no way to reset it.
myGenogramm is free of charge, for private and professional use, including in organisations and public authorities. The program is provided without any warranty; back up your files yourself. Details are in the legal notice, the handling of data in the privacy policy. The German version of the legal texts is legally binding.
A hint helps, a thank-you is a pleasure.